#and the square is green. and dark but not that dark like. like hex code 325c2f
Explore tagged Tumblr posts
Visit Tumblr Blog
Explore Tumblr blogs with no restrictions, modern design and the best experience.
Last Seen Tumblr Blogs


Fun Fact
Mobile US users spent an average of 115.8 minutes on Tumblr app monthly.
Text
(so high i can see music) Hi
#text#ok imagine a like. thin square thats like#fuck. um#like it's in 3 dimensional space but its almost 2 dimensional#and its angled so its like#like. a piece of paper but squar.e . and a little thicker#and its angled on the like. z axis?? so its tilted very slightly downwards#and the square is green. and dark but not that dark like. like hex code 325c2f#and there are many of them#Well thats the last couple econds of first few desperate hours by the mountain goats
11 notes
·
View notes
Text
A (not so) breif rant on Prince Somas skin tone
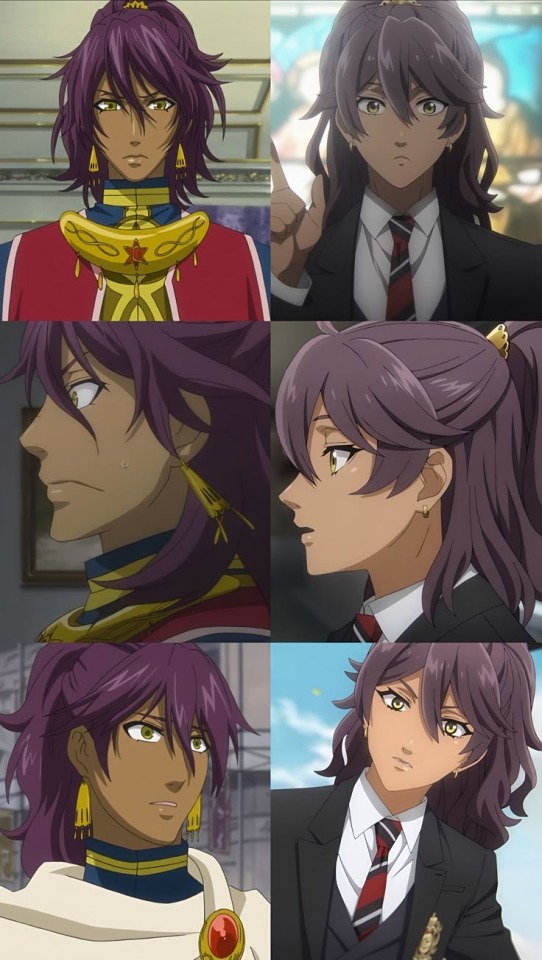
Im tired of seeing people in the comments of pinterest white nighting square enix and boot licking because theyre just grateful we got more seasons
They have actively chosen to white wash the main character of colour in kuroshitsuji for literally no good reason
dont believe that hes actually been made lighter?
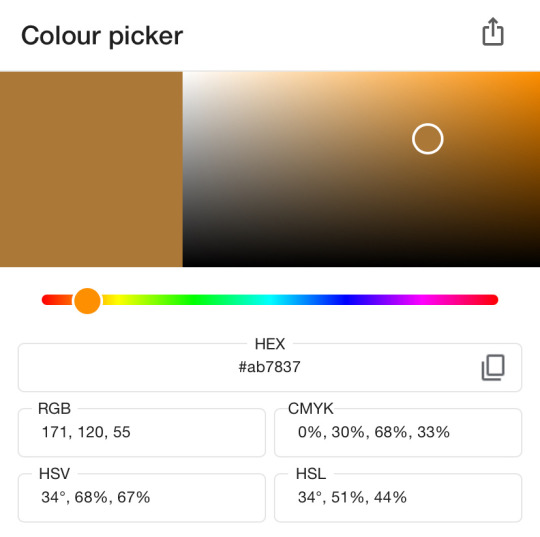
have some hex codes
old seasons:
new seasons:
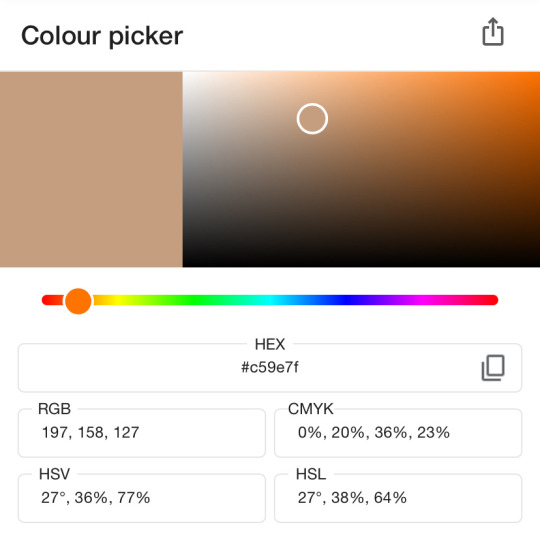
(i took these from the cheek of the above image to avoid shading, i used the top ones which i thought were actually the most generous)
i feel like were all smart enough to agree that those are not the same colour, and that while your skin can get lighter and darker from sun exposure or lack there of(aka being in the uk for a few years) the undertone of your skin cannot change that drastically (see the blue value in the hex codes, naturally, i am assuming Soma isnt using self tanner because that is ridiculous)
dont believe me that people are saying this?
lemme respond to them

Excuse me what does VA have to do with the fact that he’s objectively paler? yes the anime is brighter - that shouldnt change someones skin colour

isnt your “prob” because youre not impacted by racism bro. were complaining about something important bootlicker. im sorry that your favourite anime can be impacted by racism, welcome to the world sweet summer child.
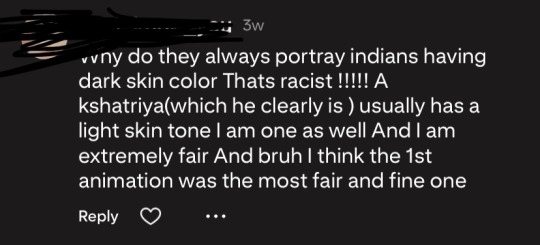
This one is basically calling the old version of Soma racist? i can barely tell honestly. but it raises an interesting point. Soma is of a higher caste -
Obviously, he is a prince. Im not about to whitesplain the victorian contemporary Indian caste system to you- if youre reading this you have access to the internet do your own research and listen to Indian voices. but the implication of him being made too dark originally is an interesting point. im not sure i agree but its atleast not completely senseless
either way no one should straight up change a characters skin tone like that for no narritive or good reason idc.


and too these two
i took the liberty of checking O!ciels skin tones using hex:
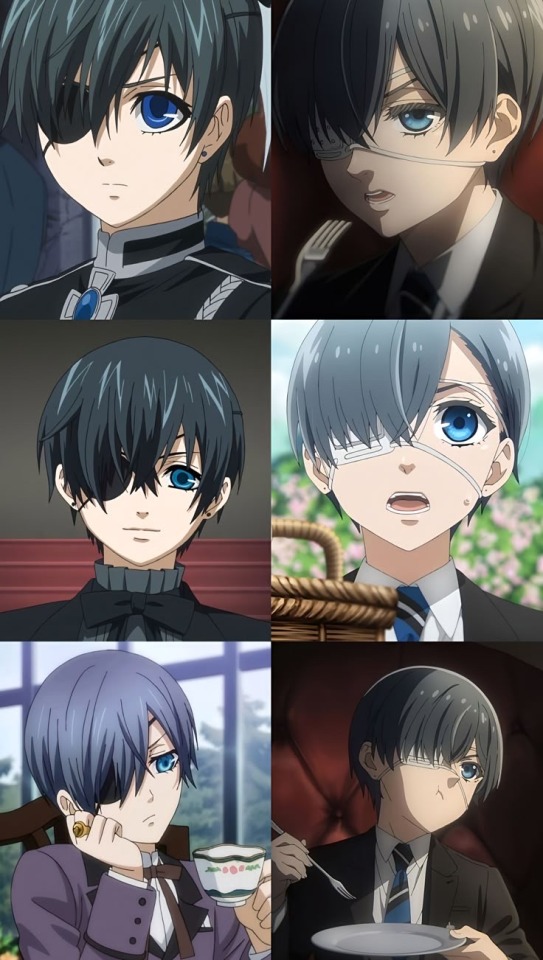
skin (especially paler skin) reflects light, which is why i look super pale outside when i wear black in the bright sun versus when im in the stark light of my all white bathroom and i genuinely look a different race -im not denying skin tone can be flexible (see grid 2 of the hex image, hes in quite dark lighting)
but just look at how consistent it is
im sure you could find screen grabs that make o!ciel look red/green/not consistently white but across seasons he is consistently a pale little victorian boy
i didnt cherry pick these images either, i stole them of pinterest (i am not taking credit but im not giving it either for anonymity sake)
its not just lighting, its not just a new animation style, and the funny thing about micro aggressions is that they dont change if we dont address them and say its wrong.
crazy that i feel the need to cite why racism is bad but fuck it here we are go read a book:
Whitewashing Capitalism: Mainstream Economics’ Resounding Silence on Race and Racism. http://doi.org/10.1177/0486613419873229
Media and Public Culture: Media Whitewashing https://doi.org/10.11588/xarep.00000349
The uses of racism: whitewashing new Europeans in the UK https://doi.org/10.1080/01419870.2012.692802
(and theyre all free access, no excuses for racists)
i promise you it is this deep, and yes i refuse to spell check
i had more i wanted to share cause im aware im not the first to discuss this, but tumblr has a ten image limit so alas i might have to make another post
#black butler#kuroshitsuji#prince soma#soma asman kadar#soma#ciel phantomhive#o!ciel#race theory#whitewashing#can you tell i study anthropology#i promise you it is that deep#im actually going insane#because how is this just okay with so many people#some dodgey heads in the kuro fandom#kuro#long post
68 notes
·
View notes
Text
#ShowYourProcess
From planning to posting, share your process for making creative content!
To continue supporting content makers, this tag game is meant to show the entire process of making creative content: this can be for any creation.
RULES — When your work is tagged, show the process of its creation from planning to posting, then tag 5 people with a specific link to one of their creative works you’d like to see the process of. Use the tag #showyourprocess so we can find yours!
Kiera @claudiablack tagged me for this post! <3<3<3<3
1. Planning
Picking shots is maybe my favorite part of giffing! With this kind of episode-specific set, I'll take it as an excuse to watch the episode first, and take note of shots I think are particularly striking. I like to alternate shots that are more portrait-like with those that are showing landscapes/objects/etc. I also like to focus on wwx, jyl, and jc when I can.
2. Creating
The most obvious part of this set that I like to do is put the white border around them, I like the feel that it creates, like it's more of a snapshot. Once I have the gif finished I'll change the canvas size to make it slightly bigger (symmetrically) and then add a white square on the bottom. <3
From a coloring perspective what makes these different is I try to tie them together by having them all have the same color layer on top (soft light at usually around 1/3 - 1/2 opacity). For this set the color was the one below, but it'll change for each (the first set in this series had a pale green on each).

[id: solid stripe a very light peach color, hex code #fee5d8. /end id]
Here's what the shot looks like before and after coloring:

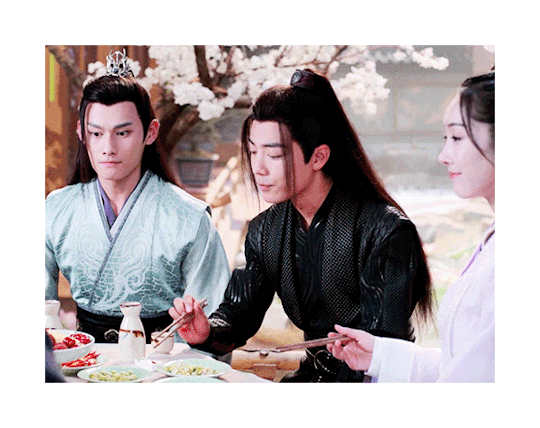
[id: two gifs of the same shot in the 11th episode, where Jiang Cheng, Wei Wuxian, and Jiang Yanli are sitting at a table eating together before looking up with caution as their mother is heard speaking. The second gif has notably darker dark colors and also has a tinge of the peach color noted before. /end id]
3. Posting
For this one specifically, I remember really liking it and posting it immediately. But I've got another one of these in my drafts right at this very moment (that's been sitting there for about a week) because I haven't quite figured out a fifth shot that pairs well with the other four.
Usually I end up making more than five gifs and slimming it down to five based on what turns out well, which is a process that usually happens over several days. I'll just come back to it when I feel like it, or as a reward for finishing some homework or something. <3
--
okay I'm going to pick out some really specific things I admire! apologies if I double tag anyone, and feel free to ignore!
@mieczyslaf and this one <3 bc I particularly like the colors here!!
@qinghe-s and really ANY of your tragicomic ghost gifs but particularly this one if you want!!
@runqings and this set or really any from this series because they always look so so so so nice
@smapis and this piece of art!! scorpion sunday babey!!!
@surii and this post which changed my life
@gusucloud and this set which is SO pretty
@milkcrates and this piece of art good GOD
OKAY i know that's more than five and i'm getting carried away but please @vvuji give us insight into your mb process like I'm specifically thinking of this one but like. they're all so good
#showyourprocess#cql#lexi speaks#my gifs#usually when tagging i'm like. let's not bother anyone#but today i was like actually you know what let's bother some people
10 notes
·
View notes
Note
#EDBFB7 #B5BFA1 #6E9887 :0 ? a very woodland-y vibe lol
i love this palette ahhh- okay, i needed practice with writing so this is a bit long haha. the colors are definitely a woodland-y vibe but they also make me think of sleeping beauty? SO, here’s a little change to a classic that i just thought up
[send me three hex codes and i’ll write something for them!]

The fairies had whisked Aurora away from the castle’s cold walls and into the woods that she’d grown to call home. They laid her to rest on a bed crafted from tulips, their petals like a watercolor painting. Her hands settled upon her chest. Her breathing was so shallow that it was almost as if she were dead- one might have fallen for the ruse if not for the rosiness of her cheeks. They were always red. She never seemed to stop blushing from the cold. Those who knew her- not her father, but her the fairies, and the forest beings, and even the girl who’d delivered produce to their cabin in the woods every month since they were twelve- knew that Aurora was quick to anger, quicker to embarrass. It was as if her blood was already rushing to her cheeks, to save time.
While her three fairy caretakers huddled around her bed, biting their nails in anticipation for the time that the rosiness would wilt, the forest changed around her. It knew Aurora as well as Aurora knew it, and she’d spent 16 years wandering those trees. Now their leaves had grown to shield her from the burn of the sun, branches twisting high above the sky. The water from the nearest creak had trickled downhill to surround her in a wide circle. It was a barrier to any who wished the princess harm- everyone knew creeks were the strongest form of protection. On the other side of the water, the folk of the forest had gathered round. Fairies hovered above. Owls and bluejays perched in the trees. A large, majestic deer stood guard beside a bundle of light colored rabbits, and even a small dragon had curled up around a trunk, watching Aurora with beady eyes. They all waited for a miracle to appear at the foot of the trickling the stream, but as the day wore on, none came.
At the cabin where Aurora had been raised, the chimney was still lit, and smoke wafted upward into the clouds. Omaira pushed the door open slowly, but no answer came when she called out the names of each of the fairies, and then Aurora’s. On a normal day, she would be greeted at the door by three kind, motherly (if not a little wild) smiles, and Aurora would rush down the stairs two at a time. Omaira had only seconds to place her basket on the nearest table before she was catching Aurora in her arms, tumbling back at the weight of her friend, and they’d laugh. Every month, on the same day, she’d make the journey. They’d lay the contents of the basket out and pick through the herbs, the spices, the fruits, and vegatables. The fairies would argue with Omaira, pushing their money at her, and Omaira would always refuse. “It’s nice enough just to visit,” she’d say, and she’d look to Aurora over their shoulders, but Aurora was never looking back.
The fire was still on, but it was beginning to fade. No food had been set out for dinner, which was strange, as Aurora would explore for hours, but she always came back for dinner, especially on a day like this. There was a cake on the counter, so tall it had begun to tilt, but even that hadn’t been touched, and the candles had melted away completely, the blue wax slipping onto the frosting. Omaira set her basket down on a chair. She’d brought sweets today, ones she’d spent forever struggling to bake. But Aurora wasn’t home, and her fairy guardian were missing as well, and the fire was still burning and they’d have put it out with a flick of a wand if they’d planned to leave. Omaira glanced at the door, which had steadily begun to open again. At its foot was a small snake, dark brown scales and a diamond pattern along his frame. The snake had nudged the door open and now stared expectantly up at her, his tongue flicking out in the air. Omaira, in the back of her mind, wondered if the snake could smell the baked goods in the room.
“Is Aurora okay?” she asked. She felt a bit silly, speaking to a snake, but animals were never normal when it came to Aurora. She had a specil skill with nature. Flowers never stopped blooming around her, even in the cold of winter. Deer never ran from her, moths flocked to her like she was a fire, and even the most dangerous of creatures fell in line when she near. When Omaira was twelve, she’d always been amazed to see it all; even now, it was still something to behold.
The snake locked eyes with her. She’s asleep, he hissed. On a bed in the woods, and she’ll sleep forever if you don’t wake her up.
Omaira had always known something like this would happen. Aurora brought nature to her doorstep, but she also brought trouble. The amount of times they’d nearly died on Aurora’s unplanned ventures... “Take me to her,” Omaira said. She used to be a voice of reason, before she met Aurora, too cautious to do anything wild.
The snake curled into a coil. I’m a messenger, he said. He sounded almost offended. Not a guide. The woods will show you the way. And then he unfurled himself and slithered away, leaving the door agape.
Omaria squared her shoulders. She grabbed the basket from the chair- if Aurora was alive after whatever this was, she’d want the sweets- and made her way outside. The sun had begun to set and in the darkening woods, a blueish light had began to glow. Omaira recognized the floating orb as a will-o'-the-wisp, although she’d never seen one before. She tugged her cloak further over her shoulders and marched towards it. The ghost light disappeared when she was feet away, and a second bobbed into existence further into the woods. Omaira followed them, struggling not to trip over branches and leaves, her shoesskidding against stray rocks.
It was hours before she heard the sound of water running. Soft pink lights shone in the distance and the final will-o'-the-wisp disappeared so only the gentle pastel lit the trees. Omaira made her way past the last of the treesand came into the clearing. Aurora lay at the center of a gathering of wild creatures, the flowers around her growing out and spreading across the ground like nimble green fingers. The first to notice Omaira’s presence was a large red deer, a stag with magestic antlers that had ancient moss dripping off it. He met her eyes searchingly- finding something he approved of, he bowed to her. On by one, each of the animals and fae turned to see her, and each, just as the stag had, bowed low and deep. Omaira spotted the three fairies hovering over Aurora’s bed. The tallest of the three, the red fairy, was watching Omaira with wide eyes. She whispered something to the other two, and they motioned Omaira over. With a deep breath she stepped carefully over the running water and made her way to the bed of tulips.
“I didn’t think it would be you,” said the red fairy gently, “but I should have known.”
“It... would be me?” Omaira frowned. “What do you mean?”
“Aurora is under a sleeping curse,” explained the yellow fairy. She gazed at Omaira with kind eyes, but they were puffy, as if she’d been crying. She cried over their 14th birthdays, cried when Aurora first learned to dance, even cried the first time Omaira stayed the night at their cabin, so excited to be able to make her try her disgusting breakfasts. “To awake her-”
“To awake her you must kiss her!” hurried the blue one. She was practically bouncing in the air, but she’d always been the quickest to excitement.
Omaira recoiled. “I have to what?”
The red fairy shook her head. “The curse requires true love’s kiss to be broken,” she said.
“I’m definitely not her true love,” Omaira said. She shook her head but didn’t back away, no matter how tempted to run she was. She’d expected dragons, not unrequited love- and now she could feel the eyes of the entire forest on her back, watching her expectantly. “It must be a prince, or a dashing noble, maybe someone who can fight an evil witch for her, but certaintly not me. I can go find them, if you need me to, but...”
“You’ve fought someone for her plenty of times,” said the blue fairy. “We’ve had to drag you away from fights before! You’re the least aggressive person I knew, but Aurora definitely taught you some of her recklessness. And you may not be a noble but you’ve always been the closest of her friends. I remember when you two first met, and Aurora turned to me after you’d left and asked if it was normal for girls to be so pretty. I’ve never laugh as hard in my life! She didn’t stop talking about you for a month, and when I made fun of her for it, she threatened to run away.”
“You two have been attached to each other’s hips for four long years,” the red fairy reminded her. “I should have known you were her true love, dear. The forest led you here for a reason.” Her gaze moved to Aurora, and so did Omaira’s.
Aurora’s chest rose slowly, and it was barely noticeable if Omaira wasn’t searching for that little sign of life. She was used to Aurora being more awake than anyone else around them- always dragging her into a spur of the moment dance. Omaira hadn’t been a confident person before sh’d met Aurora, but Auroa was bold like lights in the sky, like the stars above them. She took a shaky breath and stepped up to Aurora’s side. “Okay,” she said. There was no way to do this without it being uncomfortable, the postion and the way that Aurora was deathly quiet, her eyes closes. Omaira closed her eyes and leaned in, pressing her lips to Aurora’s.
Even as Omaira pulled away, she could feel the sudden burst of power come from them and spread across the land like a jolt of invincible lightning. Aurora’s eyes flickered open slowly, but no one spoke, or even gasped, and Omaira was too busy settling into her amazement, her nerves buzzing, to breath. At some point she’d dropped the basket onto the floor, but it didn’t matter, not now.
Aurora blinked up at her with dazed blue eyes. Omaira took a step back to give her space, for good cause- she sat up so quickly they almost bumped heads. Aurora reached her fingers to her lips and turned her head to Omaira, who could feel the burn of an invisible blush on her cheeks. She wanted to run, but it was as if the forest had tied it’s leaves around her ankles and was holding her down. Aurora’s eyes flickered up to the night sky and then back to Omaira, a familiar fierceness lighting them up. She threw her legs over the side of the bed, ignoring the petals and stems that must have irriated her ankles. “What took you so long?” she demanded. Her cheeks were aglow, although Omaira couldn’t decide if she was angry or cold.
“The kiss or... the kiss?” Omaira asked. She knew the phrase made no sense.
But Aurora just grinned, because after four long years of only loving each other, she could understand the most confusing sentences that Omaira spewed. “Both,” she said, and the forest looked away so she could hop off the bed of flowers, trip a little, fall into Omaira’s arms like a clumsy dolt she had always been, and then stand on her toes to kiss her back. “By the way,” she said, “Apparantly I’m a princess now.”
“It explains the talking animals,” Omaira said, and she savored the way Aurora laughed before she kissed her again.
#long post#i had... too much fun doing this lmaoo#my writing#ask game#ask#tenacious scripturient#sleeping beauty but gay is always my Favorite#i cannot BELIEVE i wrote 2000 words on accident. but okay. guess that just happened
9 notes
·
View notes
Text
Rabbit-hole research
This originally started with my synesthesia research, I eventually fell down a rabbit hole, so these are notes from mid-April that I thought might spring some influence into my project
Modality —
modal quality (relating to mode or form opposed to substance)
a particular mode in which something exists or is experiences or expressed — a particular method or procedure; a particular form of sensory perception
Sentience — the capacity to feel, perceive, or experience subjectively
Metaphysics — examines the fundamental nature of reality eg. mind and matter relationship
The Hum of the World, Lawrence Kramer, 2018 — macrocosm and microcosm refers to a vision of cosmos where the part (microcosm) reflects the whole (macrocosm) and vice versa, the whole universe is connected
"as above, so below” — derives from a passage from the Emerald Tablet, links to Hermeticism, Hermes Trismegistus, Tarot, and sacred geometry
Leonardo da Vinci — wrote in mirror-image cursive, possibly since he was left handed so this would avoid smudgeng of ink, or the fact that he was worried people would steal his ideas; drew the Vitruvius man
Rhombicuboctahedron — the 1495 Portrait of Luca Pacioli includes a glass rhombicubotahedron half-filled with water painted by Da Vinci, the rhombicubotahedron is an Archimedean solid with eight triangular and eighteen square faces, so there are 24 identical vertices with one triangle and three squares meeting at each one
Emerald Tablet — a compact, cryptic piece of the Hermetica reputed to contain the secret of the prima materia (first matter, the starting ingredient for the creation of the Philosophers stone) and its transmutation; emerald tablet in Dark and in The Alchemis; three parts of the wisdom of the universe which are alchemy, astrology and theurgy (a form of white magic that involves summoning a supernatural power for help)
Learning, Memory, and Synesthesia, Nathan Witthoft, 2013 — grapheme-colour synthesia; graphemes (a letter or number) that represents a sound (phoneme) in a word; ‘A’ evokes the colour red; auditory imagery; pairings in colour-grapheme synesthesia can be learned from experience in childhood, mappings that are highly precise or stable, derived from Fisher-Pryce alphabet magenta that had a repetitive colour pattern throughout so A=Red, B=Orange, C=Yellow, and etc.
Review on The Many who Tasted Shapes, Richard Cytonic, Alma R. Bicknese, 1995 — rare condition in which the modalities of one sensation, such as last, are also perceived in colours or shapes; “... compare visual synesthesia to migraine auras or hallucinations induced by LSD”; “the taste of shapes ... briefly mentioned that he was an alcoholic, and lost his ability to taste shapes when he abstained” — this is kinda funny, was he ever a synthesist, or just a drunk/high guy?
Colour Blindness, British Medical Journal, Vol. 1, No. 1061, 1881 — Daltonism or Protanopia is a form of colour blindness like red-green; once cells, L cones either deflective or missing causing less sensitivity to red or green; “mixed up yellowish-red with rose, 3 out of 18 who couldn't distinguish bluish-green and pure green”
No. 3412, 1926 — John Dalton was the first to give a scientific description of colour blindness
Colour and Psychological Functioning, Andrew J. Elliot and Markus A. Maier, Current Directions in Psychological Science, Vol. 16 No. 5, 2007 — Every visual stimulus process by the human perceptual system contains colour information; eg. green is peaceful and helps people relax” as it is a short-wavelength colour so it is calming, the lack of theory and carefully controlled experiments makes clear conclusions about colour associations and their implication elusive; colours can carry specific meaning, colour is not just about aesthetics as it also communicates specific information; colour meanings are grounded in two basic sources — learned associations that develop from repeated pairings of colours with particular messages, concepts or experiences; and biologically based proclivities to respond to particular colours in particular ways in particular situations; research indicates that colours often serve a signal function for nonhuman animals eg. the redness of fruit signals readiness for eating, thereby facilitating fitness relevant behaviour; if humans are “prepared” to respond to colour stimuli in a similar fashion then at least some colour associations may represent a cognitive reinforcing or shaping of biologically based responsive tendencies; the mere perception of colour e evokes evaluative processes; colour computations occur at an early level within the visual system and evaluative processes (basic mechanisms that discern whether a stimulus is hostile or hospitable) are so fundamental that they are present in all animate life; the evaluative processes evoked by colour stimuli produce motivated behaviour, colour stimuli that carry a positive meaning produce approach responses and vice versa avoidance responses for negative; colour typically exerts its influence on psychological functioning in an automatic fashion, the influence of colour tends to be nonconsious in nature, colour effects tend to persist even when they are deleterious; colour meanings and effects are contextual, a given colour has different implications for feelings, thoughts and behaviours in different contexts (eg. achievement contests, relational contexts); red carries meaning of danger in such contexts like achievement contexts; danger of failure; teachers use red ink to marl students mistakes and error; grounded in a more societal association; stop signs and warning signals; derived from an evolutionarily ingrained predisposition across species to interpret red as a signal of danger in competitive contexts; context must be considered not only in terms of domain but also in terms of culture
Turner: An Early Experiment with Colour theory, Gerald E. Finley, Vol. 30, 1967 — when Newton discovered that white light was composed of coloured rays and implied an essential harmony in the seven hues he chose to form the spectrum, he created a new awareness of colour as a pervasive element in nature
Hex codes —
Cyan — #00FFFF
Magenta — #FF00FF
Yellow — #FFFF00
Red — #FF0000
Green — #00FF00
Blue — #0000FF
Black — #000000
White — #FFFFFF
0 notes
Photo

I’ve decided to go ahead and open my requests again. I’ll only be making graphics of RT related things (sorry). If anyone is interested then you can either submit your idea to me or send me a tumblr IM
««----[ WHAT KIND OF GRAPHIC DO YOU WANT? ]----»»
mobile header / icons / sidebar image / blog header / gifs [ if you do want a sidebar image or blog header please include sizes ]
««----[ COLOURS / GRADIENTS / BACKGROUNDS ]----»»
if there are any specific colours, gradients or backgrounds you want me to use in the graphic then make sure to let me know eg. colours - purple / blue & green / pastel / dark colours / hex code eg. gradients - pink to white / red to orange to yellow / hex codes eg. backgrounds - marble / floral / sky / glitter / space / patterns etc.
««----[ SPECIFIC IMAGES / GIFS / VIDEOS ]----»»
if you have any in mind, send me a link to any images or videos you would like me to use because this can be really helpful. [ please make sure that the images aren’t too small when sending them ]
««----[ EXTRAS ]----»»
if you would like me to add anything else then be sure to include that too eg. shape - make use of transparency and have circular / polygonal edits eg. borders - circular / rectangular / square / polygonal eg. text - specific quotes or song lyrics / your url / names eg. flower crowns / crowns / hearts / skulls / other doodles
22 notes
·
View notes
Text
Design SVG graphics in your browser
The Vecteezy Editor is a free vector editing suite that runs right in your browser. This tutorial covers the basic shape tools and editing tools you can use to edit any vectors on the site. This way you can build badges, buttons, logos, or anything else with relative ease.
The GUI for this editor feels similar to Adobe software, so if you already use Photoshop or Illustrator, you’ll have an easier time learning the ropes. But even complete beginners can dive into this and pick up the basics from scratch.
Get Adobe Creative Cloud
We’re going to use these shopping icons from Vecteezy.
Just visit the icons page and click the ‘Edit & Download’ button. This opens the editor right in your browser so you can customise and build upon these graphics. For this tutorial, we’ll show you how to nab some of these icons and convert them into a larger progress bar graphic – the perfect choice for any eCommerce homepage.
So with those shopping icons open in the Vecteezy Editor, we can get started!
01. Pick the icons
Click into the icon group and select one icon, then click Duplicate at the top
Double-click on the icon group to select all the icons (you might need to double-click twice). I’ll use three specific icons for this tutorial: the shopping bags, the credit card and the gift box.
Select the shopping bag and click Duplicate at the very top of the page. This should give you a duplicate of the whole icon. Move this up towards the top and duplicate the other two.
Note: the gift box isn’t fully grouped, so when you click to duplicate you’ll only select a piece of the icon. To fix this, just drag a selection box over the entire gift icon, then at the top click Edit->Group. Now, you can duplicate the whole present icon with one click.
Once you have duplicates of all three icons, double-click anywhere on the empty canvas. This brings you outside the group of icons so you can select other objects on the page. If you click any of the older icons, you’ll select the whole group. This is perfect, because you’ll want to drag them down off the canvas so they’re out of sight.
02. Clear the rubbish
Change the background opacity if you want it to be white instead of transparent
Double-click on each duplicated icon to access the individual shapes inside. We only need the main icon, so you should select and delete the colourful circle backgrounds and drop shadows.
To do this, simply zoom in very close and select the background circle. Then press Delete, and it should disappear.
If the entire icon disappears – don’t panic. Just click Undo near the top or press Ctrl/Cmd+Z and try again. You may need to double-click to get inside the icon group.
By the end, you should have three clean icons ready to use. If you don’t like the transparent background you can always access the Background panel in the left-hand menu (third button down) and increase the opacity to 100 per cent for a pure white background.
03. Adding text
Add text labels under each icon with the same font settings
This progress bar will be incredibly simple; just advertising three stages of an eCommerce shop.
To emphasise this process, let’s add labels underneath each icon. In the left-hand toolbar, find the Text tool (second button) then click underneath the bag icon to add a text block. Add the text ‘SHOP’ and hit Enter on your keyboard.
This auto-selects the text so you can move it around and find a good position. But if you select the Text tool again, you can change the font family, colour, size, letter spacing and other features.
I’m using Open Sans Semi-Bold size 30 with a -1.50 letter spacing. Text colour is #525252.
Duplicate this text twice and place the duplicates under the other icons. Use the text ‘PAY’ under the credit card icon and ‘RECEIVE’ under the gift box.
You should use the Select tool for repositioning the icons above the text. Also, space each icon close to equidistant apart if possible.
04. Adjusting graphics
Shift+click to select the ribbon shapes and change the background colour
Before creating the progress bar, you can alter any colours you like in the icons.
To do this, double-click to enter any icon group, then select whatever shape you want to change. In this case, I’ll edit the gift box ribbon to change the colour from blue to green.
Once you’re inside the icon group, hold Shift while clicking to select more than one item at a time. I’ll select the horizontal and vertical rectangles, plus the bow shape at the top.
In the Select panel (first icon in the left-hand menu) find the Fill settings. You’ll see the default colour is #2e3192. Click that Fill menu to access a drop-down colour wheel. Here, you can either drag around to find the colour you want, or enter a hex code directly.
Enter #518531 and hit Enter. This should save the result and update all three shapes at once. Feel free to play around with any other colour settings you’d like to change!
05. Starting the progress bar
Click the top-left circle in the Elements panel to add a new circle to the canvas
To create a progress bar, you only need two shapes: circles and rectangles. Thankfully, both of these are available in the Elements panel located at the very bottom of the Tools menu.
Click to Elements panel and select the circle shape, which is the very first item in the list. It’ll automatically place a dark grey circle in the centre of your workspace.
You can resize the circle by dragging the little white square boxes in the corner or the select boundary. This works well, but it’s not as precise as the direct resizing feature.
So instead go back to the Select tool and make sure your new circle is selected. At the very top of the Select tool panel, you should see a selection size with a height and width value.
Enter 100 in both fields and drag your first circle under the first icon.
06. Duplicating circles
Resize the circle and duplicate twice, then move them under each shopping icon
With your circle shape selected, click Duplicate in the top menu. Now, reposition this duplicate so it aligns closely with your original circle. Try to get it right on top of the first circle so they look like one shape.
Now, if you hold Shift and click, you can drag this duplicate circle in a straight line horizontally. This lets you perfectly align all your circles together in a straight line (or close enough to one).
Do this until you have three different circle shapes at 100 x 100, each placed underneath the three icons.
07. Add some connecting lines
Select the rectangle shape and arrange it behind the three circles
Move back to the Elements panel and find the square shape. Click to add one square onto the canvas.
With this shape selected move back to the Select tool and find the width/height size panel. Since this rectangle should span the entire width of the progress bar, we just need one really long shape. So change the height to 10 and the width to whatever number you need to connect all your circles together. Mine is 750 wide.
Now, with this rectangle in position, look towards the bottom of the Select panel where it says Arrange & Flip. Click the second icon in the top row, which lets you move any selected shape behind the other shapes.
Note: you may have to click the Lower button a few times to get the rectangle behind all three circles. But now the connecting rectangle is only visible between the circle shapes, so we can add text into the circles later.
08. Recolouring
Recolour all the shapes and include a small stroke on the three circles
The current progress bar looks a little dark, so let’s alter the colour a bit.
Click to select the long rectangle and find the Fill Settings in the Tools panel. Change the colour to #c5c5c5 and hit Enter.
Now, click anywhere off-canvas to deselect the rectangle. We also want to change the circle colours, and they should be lighter, using the darker grey as a border colour.
Hold Shift, and click each of the three circles. Adjust the fill colour to #f5f5f5, hit Enter and then click the X icon to close the fill colour select panel. Below, you’ll find stroke settings. Change the stroke fill to #c5c5c5 and hit Enter.
Click the X icon to close this colour selection panel, then change the stroke size to 6. At this stage I also recommend grouping all the circles and the rectangle together by dragging a selection box and going to Edit>Group. Now, you can adjust the position of all shapes at once with ease.
09. Adding progress steps
Add a text label into the first circle and duplicate the text for all three shapes
Let’s add some numbers into each circle to finalise the progress bar design.
Click the Text tool and enter the number 1 into the first circle. I’m using Open Sans Extra-Bold, size 45 with the colour #c5c5c5 to match the borders. Drag this text so it’s positioned in the centre of the circle.
Duplicate the text element and move it into the second circle with the text ‘2’. Do the same for the third circle with text ‘3’.
10. Highlight the first step
Recolour the first circle blue so it appears like the active progress step
As a finishing touch, let’s highlight the very first step using a lighter blue outline. First select the number ‘1’ you just created, and change the fill to #4976a3. Then click to select the circle behind the text. Find the Stroke Settings and change the stroke colour to #4976a3. This should add a dark blue border around the circle. With the circle still selected, click the Fill Settings and change the colour to #e2ebfa.
And that’s it! Now you can export this as a PNG/JPG using the Download feature in the top-right corner. You can also hide the white background to export this as a transparent PNG and change the overall document size using the Background panel (third button in the left-side menu).
Or if you’d like to save this for future changes, just go to File>Save For Later. You’ll have to create a free Vecteezy account but it’s a great way to keep your hard work saved for future reference.
This article originally appeared in net magazine issue 295. Buy it here.
Read more:
10 golden rules for responsive SVGs
Explore the exciting new features in SVG 2
Supercharge SVG animations with GSAP
This post comes from the RSS feed of CreativeBlog, you can find more here!
The post Design SVG graphics in your browser appeared first on Brenda Gilliam.
from Brenda Gilliam https://brendagilliam.com/design-svg-graphics-in-your-browser/
0 notes
Link
(Via: Hacker News)
Why I wrote this tutorial
In attempting to understand the inner workings of JPEG compression, I was unable to find any real details on the net for how Huffman coding is used in the context of JPEG image compression. There are many sites that describe the generic huffman coding scheme, but none that describe how it will appear in a JPEG image, after factoring in the DHT tables, interleaved chroma subsampling components, etc. While it is relatively easy to understand the JPEG marker extraction, the Start of Scan data segment is the least understood and most important part of the image data. Therefore, I decided to create a page to walk through a decompression example. Hopefully others will find this useful!
The relevant sections in the JPEG Standard are quite obscure -- enough so that I set out to analyze several JPEG images to reverse-engineer how the huffman coding was being applied in a JPEG JFIF file.
Latest Update:
[09/22/2009]: Corrected Table 5 (added entry for DC 00 code). [09/19/2008]: Corrected Table 1 (added entry for codes of length 9 bits). [12/03/2007]: Corrected typo in text near Table 5 (code 00101). Added JPEGsnoop output (at end of Tutorial). [01/27/2007]: Added section describing how to expand DHT into bit strings.
The Goal
The goal of this tutorial is to take a simple JPEG image and try to decode the compressed image data by hand, learning how the Huffman compression scheme works in the process.
Simplest JPEG Example
Most digital photos are full-color natural/organic images, which means that all three image components (one luminance and two color channels) will all have both low and high-frequency content. In addition, nearly all digital photos use chroma subsampling, which makes the extraction process a little more complicated. For the purposes of showing the basic huffman extraction, we will start with the simplest of all JPEG images:
Grayscale - no content in the two color channels
Solid color in each MCU - By making all pixels in an 8x8 block the same color, there will be no AC components.
No chroma subsampling - Makes scan data extraction simpler: Y, Cb, Cr, Y, Cb, Cr, etc.
Small Image - Total image size is 16x8 = two MCUs or blocks. This makes the extraction in this tutorial shorter.
Creating the Image
For the purposes of this tutorial, my working image will simply be a 16x8 pixel image, with two solid color blocks: one black and the other white. Note that each block is 8x8 pixels in size. The actual image is here: . If you want to download it, right-click and select Save Picture As...
Creating the sample image was trivial, working at 1600% view. Important that dimensions and any changes in the content are on 8-pixel boundaries. Overall image dimensions should be a multiple of 8 pixels as well, in both directions. The image below is a magnified version with a grid overlayed.
Once the image was created, it was saved with Photoshop CS2's Save for Web... command. This kept the file size down as it discards other extraneous file information (metadata, etc.) that is not relevant to this tutorial. Some other important points:
Use Save for Web - Reduces total file content to minimal subset.
Use Quality level 51+ - This ensures that there is no chroma subsampling enabled in the JPEG encoding process, according to the way that Photoshop Save for Web operates. I used quality 80 for this example.
Turn Optimized Off - For the purposes of this example, I think it is important to work with realistic huffman tables, not degenerate single-entry tables. Therefore I recommend that JPEG Huffman Table Optimization is left off.
Other settings: Blur off, Progressive off, ICC profile off.
Grayscale Photoshop Images
It should be noted that when you save a JPEG image from within Photoshop it always contains three components (Y, Cb, Cr). If you change the mode to grayscale (via Mode->Grayscale), the three components are still saved, even though the JPEG standard supports an image with only one component (which would be assumed to be grayscale).
What is Huffman Coding / Entropy Coding?
Huffman coding is a method that takes symbols (e.g. bytes, DCT coefficients, etc.) and encodes them with variable length codes that are assigned according to statistical probabilities. A frequently-used symbol will be encoded with a code that takes up only a couple bits, while symbols that are rarely used are represented by symbols that take more bits to encode.
A JPEG file contains up to 4 huffman tables that define the mapping between these variable-length codes (which take between 1 and 16 bits) and the code values (which is an 8-bit byte). Creating these tables generally involves counting how frequently each symbol (DCT code word) appears in an image, and allocating the bit strings accordingly. But, most JPEG encoders simply use the huffman tables presented in the JPEG standard. Some encoders allow one to optimize these tables, which means that an optimal binary tree is created which allows a more efficient huffman table to be generated.
For a reasonable explanation of how it works, please see this example of Huffman coding an ASCII string and the overview from Wikipedia.
For more details, please see my article on Optimized JPEGs - optimizing the huffman tables, particularly the first introductory sections and the section near the end titled "Standard Huffman Tables".
Decoding the JPEG Scan Data
Using JPEGsnoop
For those who are trying to understand the complex huffman decoding in a JPEG image, I'm happy to report that JPEGsnoop can now report all of the variable length code decoding for each MCU (use the Detailed Decode option). For the sample output, scroll to the bottom of this tutorial.
Decoding by Hand
The following is the decode method done by hand, which is obviously impractical for most images, but is shown here in detail to help one learn the process involved.
The above hex dump datastream shows the beginning of the Start of Scan (SOS marker 0xFFDA) marked in yellow, followed by some additional details in green and then the actual scan data selected in dark blue. Finally, the image is terminated with an End of Image (EOI marker 0xFFD9). So, the huffman-coded data content is only 9 bytes long.
Comparison of Compression File Sizes
For the sake of comparison, the original image (16 pixels by 8 pixels) contains a total of 128 pixels (2 MCUs). With 8 bits per channel (RGB), this corresponds to an uncompressed image size of 384 bytes (128 pixels x 8 bits/channel x 3 channels x 1 byte/8 bits). Clearly, using a run-length encoded format such as GIF would have produced even more image compression in examples like this (although GIF actually takes 22 bytes to code the stream because there are 16 separate runs). JPEG is not really designed to be optimized for this type of synthetic (non-organic) image.
If one uses optimized JPEG encoding, it is possible to reduce the image content size even further. In the example image, the optimized version has much smaller huffman tables (DHT) and shorter bitstrings to represent the same codewords. The net effect is that the image content size is reduced even further (to 7 bytes).
File Format Total Size Overhead Size Image Content Size BMP (Uncompressed) 440 Bytes 56 Bytes 384 Bytes JPEG 653 Bytes 644 Bytes 9 Bytes JPEG (Optimized) 304 Bytes 297 Bytes 7 Bytes GIF 60 Bytes 38 Bytes 22 Bytes
Scan Data Decode
The scan data is:
FC FF 00 E2 AF EF F3 15 7F
To help resiliency in the case of data corruption, the JPEG standard allows JPEG markers to appear in the huffman-coded scan data segment. Therefore, a JPEG decoder must watch out for any marker (as indicated by the 0xFF byte, followed by a non-zero byte). If the huffman coding scheme needed to write a 0xFF byte, then it writes a 0xFF followed by a 0x00 -- a process known as adding a stuff byte.
For our extraction purposes, we will replaceme any padding bytes (0xFF00 with 0xFF):
FC FF E2 AF EF F3 15 7F
The expectation is that image content is 3 components (Y, Cb, Cr). Within each component, the sequence is always one DC value followed by 63 AC values.
For each MCU, with no chroma subsampling, we would expect the following data to be encoded:
Section 1 2 3 4 5 6 Component Y Cb Cr AC / DC DC AC DC AC DC AC
Note that some people get the order of the chrominance channels mixed up, and assume that it is YCrCb instead.
The figure below shows what the DCT matrix from a single MCU (8x8 pixel square) in a digital photo typically looks like. These are the entries after quantization, which has caused many of the higher-frequency components (towards the bottom-right corner of the matrix) to become zero. By the distribution of values in the frequency-domain matrix representation, it is possible to determine that the 8x8 pixel square had very little high-frequency content (i.e. it had only a gradual intensity / color change).
The DC component represents the average value of all pixels in the 8x8 MCU. Since we have deliberately created an image where all pixels in the 8x8 block are the same, we expect this value to represent either the black or white "color". The code provided in the DC entry (#0) indicates a huffman-encoded size (e.g. 1-10 bits) which is the number of bits needed to represent the average value for the MCU (eg. -511...+511).
Note that the DC component is encoded as a relative value with respect to the DC component of the previous block. The first block in the JPEG image is assumed to have a previous block value of zero.
Following the single DC component entry, one or more entries are used to describe the remaining 63 entries in the MCU. These entries (1..63) represent the low and high-frequency AC coefficients after DCT transformation and quantization. The earlier entries represent low-frequency content, while the later entries represent high-frequency image content. Since the JPEG compression algorithm uses quantization to reduce many of these high-frequency values to zero, one typically has a number of non-zero entries in the earlier coefficients and a long run of zero coefficients to the end of the matrix.
For the purposes of this tutorial, I have deliberately created an image that has constant color across all 8x8 pixels in each of the two MCU. Because there are no changes in value across each 8x8 pixel region, there is no AC (or higher frequency content) within the block. As a result, all 63 entries in the AC portion are expected to be zero (unlike the figure above). This allows us to focus on the DC component, which we do expect to change from MCU to MCU block.
The hex string shown earlier (after removal of padding bytes) can be represented in binary as the following:
1111 1100 1111 1111 1110 0010 1010 1111 1110 1111 1111 0011 0001 0101 0111 1111
Extract Huffman Code Tables
Using a utility such as JPEGsnoop, you can extract the Huffman tables from the JPEG image file. Often, you will find four huffman table entries (tagged with a DHT marker):
DHT Class=0 ID=0 - Used for DC component of Luminance (Y)
DHT Class=1 ID=0 - Used for AC component of Luminance (Y)
DHT Class=0 ID=1 - Used for DC component of Chrominance (Cb & Cr)
DHT Class=1 ID=1 - Used for AC component of Chrominance (Cb & Cr)
The huffman compression tables are encoded in a somewhat confusing manner. Although you can draw out the binary tree by hand, it will be easier if you rely on a tool such as JPEGsnoop to generate all of the binary comparison strings for each huffman code in all four DHT sections.
The following four tables were extracted from the JPEG file that was created by Photoshop for the purposes of this tutorial. Other JPEG images may be reliant on different DHT tables, so it is important to extract them prior to analyzing the file. Note that turning on JPEG Optimization will create vastly different Huffman tables, with far fewer entries. For a point of comparison, the image described in this tutorial would only need optimized huffman tables of one entry each to represent our image content.
NOTE: It is important to realize that in each case the DHT entries in the JPEG file only list the Length and Code values, not the actual Bit String mapping. It is up to you to rebuild the binary tree representation of the DHT table to derive the bit strings! Please see the DHT Expansion section near the end of this tutorial for more details.
Table 1 - Huffman - Luminance (Y) - DC
Length Bits Code 3 bits 000 001 010 011 100 101 110 04 05 03 02 06 01 00 (End of Block) 4 bits 1110 07 5 bits 1111 0 08 6 bits 1111 10 09 7 bits 1111 110 0A 8 bits 1111 1110 0B
Table 2 - Huffman - Luminance (Y) - AC
Length Bits Code 2 bits 00 01 01 02 3 bits 100 03 4 bits 1010 1011 1100 11 04 00 (End of Block) 5 bits 1101 0 1101 1 1110 0 05 21 12 6 bits 1110 10 1110 11 31 41 ... ... ... 12 bits ... 1111 1111 0011 ... ... F0 (ZRL) ... ... ... ... 16 bits ... 1111 1111 1111 1110 ... FA
Table 3 - Huffman - Chrominance (Cb & Cr) - DC
Length Bits Code 2 bits 00 01 01 00 (End of Block) 3 bits 100 101 02 03 4 bits 1100 1101 1110 04 05 06 5 bits 1111 0 07 6 bits 1111 10 08 7 bits 1111 110 09 8 bits 1111 1110 0A 9 bits 1111 1111 0 0B
Table 4 - Huffman - Chrominance (Cb & Cr) - AC
Length Bits Code 2 bits 00 01 01 00 (End of Block) 3 bits 100 101 02 11 4 bits 1100 03 5 bits
1101 0 1101 1
04 21 6 bits 1110 00 1110 01 1110 10 12 31 41 ... ... ... 9 bits ... 1111 1100 0 ... ... F0 (ZRL) ... ... ... ... 16 bits ... 1111 1111 1111 1110 ... FA
Table 5 - Huffman DC Value Encoding
The following table shows how the bit fields that follow a DC entry can be converted into their signed decimal equivalent. To use this table, start with the DC code value and then extract "Size" number of bits after the code. These "Additional Bits" will represent a signed "DC Value" which becomes the DC value for that block. Note that this table applies to any JPEG file -- this table is not written anywhere in the JPEG file itself.
For example, let's assume that one was about to decompress a chrominance DC entry. If the previously-decoded "DC Code" was 05, then we must extract 5 bits following the code bits. If the next 5 bits were 00101, then this can be interpreted as decimal -26. The bits 10001 would be +17 and 11110 would be +30.
DC Code Size Additional Bits DC Value 00 0 0 01 1 0 1 -1 1 02 2 00,01 10,11 -3,-2 2,3 03 3 000,001,010,011 100,101,110,111 -7,-6,-5,-4 4,5,6,7 04 4 0000,...,0111 1000,...,1111 -15,...,-8 8,...,15 05 5 0 0000,... ...,1 1111 -31,...,-16 16,...,31 06 6 00 0000,... ...,11 1111 -63,...,-32 32,...,63 07 7 000 0000,... ...,111 1111 -127,...,-64 64,...,127 08 8 0000 0000,... ...,1111 1111 -255,...,-128 128,...,255 09 9 0 0000 0000,... ...,1 1111 1111 -511,...,-256 256,...,511 0A 10 00 0000 0000,... ...,11 1111 1111 -1023,...,-512 512,...,1023 0B 11 000 0000 0000,... ...,111 1111 1111 -2047,...,-1024 1024,...,2047
Block 1 - Luminance
Luminance (Y) - DC
Referring to the Y(DC) table (Table 1), we start with the first few bits of the coded stream (1111 1100 1111...) and recognize that code x0A matches the bit string 1111 110.
1111 1100 1111 1111 1110 0010 1010 1111 1110 1111 1111 0011 0001 0101 0111 1111 => Code: 0A
This code implies that hex A (10) additional bits follow to represent the signed value of the DC component. The next ten bits after this code is 0 1111 1111 1. Table 5 above shows the DC values represented by these "additional bits" -- in this case, the bit string corresponds to a value of -512.
1111 1100 1111 1111 1110 0010 1010 1111 1110 1111 1111 0011 0001 0101 0111 1111 => Value: -512
Our progress so far:
Bits 1111 1100 1111 1111 1 110 0010 1010 1111 1110 1111 1111 0011 0001 0101 0111 1111 MCU 1 ??? Component Y ??? AC/DC DC ??? Value -512 ???
Luminance (Y) - AC
After the DC component, we begin the 63-entry AC matrix for the Y Luminance. This uses a different Huffman table (Table 2).
1111 1100 1111 1111 1110 0010 1010 1111 1110 1111 1111 0011 0001 0101 0111 1111 => Code: 00 (EOB)
In the above huffman code table, the code 1100 corresponds to an EOB (End of Block). Therefore, the AC components was cut short early (no other codes). This means that all 63 entries of the matrix (all entries except the 1st entry, which is the DC component) are zeros. Since we have finished the luminance component, we then move on to the chrominance components (Cb and Cr).
Bits 1111 1100 1111 1111 1 1100 010 1010 1111 1110 1111 1111 0011 0001 0101 0111 1111 MCU 1 ??? Component Y ??? AC/DC DC AC ??? Value -512 0 ???
Block 1 - Chrominance
Chrominance (Cb) - DC
1111 1100 1111 1111 1110 0010 1010 1111 1110 1111 1111 0011 0001 0101 0111 1111 => Code: 00 (EOB)
End of chrominance DC, start on AC.
Chrominance (Cb) - AC
1111 1100 1111 1111 1110 0010 1010 1111 1110 1111 1111 0011 0001 0101 0111 1111 => Code: 00 (EOB)
Again, the AC is terminated right away. Now, we move on to the second chrominance channel, Cr.
Bits 1111 1100 1111 1111 1 1100 01 01 010 1111 1110 1111 1111 0011 0001 0101 0111 1111 MCU 1 ??? Component Y Cb ??? AC/DC DC AC DC AC ??? Value -512 0 0 0 ???
Chrominance (Cr) - DC
Refer to Table 3 for the relevant Huffman codes.
1111 1100 1111 1111 1110 0010 1010 1111 1110 1111 1111 0011 0001 0101 0111 1111 => Code: 00 (EOB)
This marks the end of the DC.
Chrominance (Cr) - AC
Refer to Table 4 for the relevant Huffman codes.
1111 1100 1111 1111 1110 0010 1010 1111 1110 1111 1111 0011 0001 0101 0111 1111 => Code: 00 (EOB)
This marks the end of the AC.
Bits 1111 1100 1111 1111 1 1100 01 01 01 01 111 1110 1111 1111 0011 0001 0101 0111 1111 MCU 1 ??? Component Y Cb Cr ??? AC / DC DC AC DC AC DC AC ??? Value -512 0 0 0 0 0 ???
Block 2 - Luminance
Luminance (Y) - DC
1111 1100 1111 1111 1110 0010 1010 1111 1110 1111 1111 0011 0001 0101 0111 1111 => CODE: 0A
This code indicates that the value is stored in the next ten bits (A in hex is 10 in decimal):
1111 1100 1111 1111 1110 0010 1010 1111 1110 1111 1111 0011 0001 0101 0111 1111 => Value: +1020
Bits 1111 1100 1111 1111 1 1100 01 01 01 01 111 1110 1111 1111 00 11 0001 0101 0111 1111 MCU 1 2 ??? Component Y Cb Cr Y ??? AC / DC DC AC DC AC DC AC DC ??? Value -512 0 0 0 0 0 +1020 ???
Luminance (Y) - AC
1111 1100 1111 1111 1110 0010 1010 1111 1110 1111 1111 0011 0001 0101 0111 1111 => CODE: EOB
The end-of-block indicator means that all remaining values are zero. Since we haven't even started with the first value, all 63 values can be interpreted as zero. This means that there is no non-DC image content, which is to be expected since all 64 pixels (8x8) in the block are the same color.
Bits 1111 1100 1111 1111 1 1100 01 01 01 01 111 1110 1111 1111 00 1100 01 0101 0111 1111 MCU 1 2 ??? Component Y Cb Cr Y ??? AC / DC DC AC DC AC DC AC DC AC ??? Value -512 0 0 0 0 0 +1020 0 ???
Block 2 - Chrominance
Chrominance (Cb) - DC
1111 1100 1111 1111 1110 0010 1010 1111 1110 1111 1111 0011 0001 0101 0111 1111 => CODE: 00 (EOB)
Chrominance (Cb) - AC
1111 1100 1111 1111 1110 0010 1010 1111 1110 1111 1111 0011 0001 0101 0111 1111 => CODE: 00 (EOB)
Chrominance (Cr) - DC
1111 1100 1111 1111 1110 0010 1010 1111 1110 1111 1111 0011 0001 0101 0111 1111 => CODE: 00 (EOB)
Chrominance (Cr) - AC
1111 1100 1111 1111 1110 0010 1010 1111 1110 1111 1111 0011 0001 0101 0111 1111 => CODE: 00 (EOB)
Bits 1111 1100 1111 1111 1 1100 01 01 01 01 111 1110 1111 1111 00 1100 01 01 01 01 11 1111 MCU 1 2 X Component Y Cb Cr Y Cb Cr X AC / DC DC AC DC AC DC AC DC AC DC AC DC AC X Value -512 0 0 0 0 0 +1020 0 0 0 0 0 X
Remainder
Because the scan data must end on a byte boundary, there may be a remainder of bits that will simply be tossed. In this case we see 6 bits (all-1's) that will be discarded.
1111 1100 1111 1111 1110 0010 1010 1111 1110 1111 1111 0011 0001 0101 0111 1111
Conversion to Spatial Domain
Now that we have the DCT (Discrete Cosine Transform) values, we can try to determine what the content of the image was in the spatial domain. Remember that the DC & AC values that we decompressed from the huffman coding are the frequency-domain representation of the image, not the real YCbCr values.
Given that all of the values in the Cb and Cr channels (chrominance) are zero, we can assume that the image is grayscale and instaed focus on the luminance values (brightness).
Second, all of the AC component values are zero, which means that there is no higher frequency content in the images -- in fact, we can determine that all of the image data in each 8x8 block is of the same color & intensity (i.e. only the DC component remains).
We can determine the following:
Block Encoded (Relative) DC Value 1 Y = -512 2 Y = +1020
Relative DC to Absolute DC
Note that the DC components are encoded as a difference from the previous block (with the first block assumed to start relative to zero). Therefore, we know that block 1 has a DC value of -512, but that block 2 has a DC value of +1020 relative to block 1. So, we now know:
Block Actual (Absolute) DC Value 1 Y = -512 2 Y = +508
DCT to RGB
Finally, we want to convert the DCT DC value to an RGB value. Assuming that the gain of the DCT transform is 4, we divide the values by 4 to get block1 = -128, block2 = +127.
Now, we have to convert between YCbCr and RGB. Please refer to the formulae provided on the JPEG color conversion page. There, you will see that we require a level shift of +128 to get input values in the range (0..255).
Color conversion yields RGB values of:
Block RGB Value (hex) RGB Value (decimal) 1 (0x00,0x00,0x00) (0,0,0) 2 (0xFF,0xFF,0xFF) (255,255,255)
... and these are the original values that were used to create the JPEG image!
Expansion of DHT Table into binary bit strings
Note that the DHT tables that appear in the JPEG file only define the number of codes for each bitstring length, followed by a sequence of all the code words. The bit strings that are used to represent each of these code words is not included! It is the job of the JPEG decoder to derive these bit strings from the little information that is provided.
There are many methods in which the generation of the binary strings is performed in a decoder, and most of them are heavily optimized for performance (e.g. the djpeg huffman routines). These implementations are quite difficult to learn from. I find it much more instructive to generate these bit sequences by drawing out the huffman binary tree by hand.
In an extreme simplification, binary trees are composed of a root node which has a left and right branch to other nodes. Each of these nodes can either be a leaf node (the end of a branch) or split further into two more nodes.
The actual DHT in the JPEG file:
The following was extracted directly from the DHT (Define Huffman Table, shown above in Table 2: Luminance AC) in the JPEG file using JPEGsnoop.
Class = 1 (AC Table) Destination ID = 0 Codes of length 01 bits (000 total): Codes of length 02 bits (002 total): 01 02 Codes of length 03 bits (001 total): 03 Codes of length 04 bits (003 total): 11 04 00 Codes of length 05 bits (003 total): 05 21 12 Codes of length 06 bits (002 total): 31 41 Codes of length 07 bits (004 total): 51 06 13 61 Codes of length 08 bits (002 total): 22 71 Codes of length 09 bits (006 total): 81 14 32 91 A1 07 Codes of length 10 bits (007 total): 15 B1 42 23 C1 52 D1 Codes of length 11 bits (003 total): E1 33 16 Codes of length 12 bits (004 total): 62 F0 24 72 Codes of length 13 bits (002 total): 82 F1 Codes of length 14 bits (006 total): 25 43 34 53 92 A2 Codes of length 15 bits (002 total): B2 63 Codes of length 16 bits (115 total): 73 C2 35 44 27 93 A3 B3 36 17 54 64 74 C3 D2 E2 08 26 83 09 0A 18 19 84 94 45 46 A4 B4 56 D3 55 28 1A F2 E3 F3 C4 D4 E4 F4 65 75 85 95 A5 B5 C5 D5 E5 F5 66 76 86 96 A6 B6 C6 D6 E6 F6 37 47 57 67 77 87 97 A7 B7 C7 D7 E7 F7 38 48 58 68 78 88 98 A8 B8 C8 D8 E8 F8 29 39 49 59 69 79 89 99 A9 B9 C9 D9 E9 F9 2A 3A 4A 5A 6A 7A 8A 9A AA BA CA DA EA FA Total number of codes: 162
So, how do we create the binary bit-strings for each of these codes?
Well, we start to build a binary tree, creating new branches and putting the code words into leaf nodes of the tree. Row 1 of the tree contains code words that only require 1 bit to encode, row 2 contains code words (leaf nodes) that only require 2 bits to encode and so on.
We first start with row 0:
Row 0 (the root node) is almost always a parent node, creating a left and a right branch down to the next row. We label the left branch 0 and the right branch 1.
At row 1, we try to fill in any of the nodes (there are 2 at this level) with code words that take 1 bit to encode. We see from the DHT that there are no codes of length 1 bit. So, for each of the two nodes we spawn off a left and right node below (on row 2), creating a total of 4 nodes. Again, for these branches, we label the left one 0 and the right one 1.
At row 2, we will try to fill in any codes of length 2 bits, starting from left to right. This time we see in the DHT that there are two codes that can be encoded with bit strings of length 2. So, we take the first code value x01 (hex) and place this in the first node, making it a leaf node (no further branches will come from it). We then take the second code value x02 and place this in the second node, making it too a leaf node. At this point we have two more nodes left in this row of the tree but no more codewords listed in the DHT for this bitstring length. Therefore, we create two branches for each of the remaining nodes of this row. Since two nodes are left, this will create a total of 4 branches, meaning that there will be again 4 nodes in the third row of the binary tree.
At row 3, we have four nodes available, but the DHT indicates only one codeword uses 3 bits to encode. So, we place x03 at the leftmost of these nodes, and we create branches for each of the remaining three nodes (making 6 nodes for row 4).
At row 4, we have six nodes available, but the DHT indicates only three codewords use 4 bits to encode. This time we terminate three nodes (making them leaf nodes) and we further extend the other three down to row 5.
This process continues until we have used all of the codewords defined in the DHT table. The diagram below shows the expansion of the first four rows of the above DHT.
Binary Tree Expansion of DHT
NOTE: I understand from VG that the above representation may be "right-oriented" rather than "left-oriented"
Once the binary tree has been completed, you can read off the bit strings for each code word by combining the bit labels of each branch on the path down from the root node. For example, code word 0x04 is encoded by the binary bit string 1011 because we need to take branch 1 from the root node, 0 from the node on row 1, 1 from the node on row 2 and branch 1 from the node on row 3.
This process can be quite laborious, and the binary tree often takes on a shape that would be difficult to draw through to completion. To make this easier, I have added a feature, DHT Expand, to JPEGsnoop that determines the binary bit strings for each of the code words appearing in the DHT table.
Below is the expansion of the first few rows of the table, using JPEGsnoop with the DHT Expand mode enabled.
Expanded Form of Codes: Codes of length 02 bits: 00 = 01 01 = 02 Codes of length 03 bits: 100 = 03 Codes of length 04 bits: 1010 = 11 1011 = 04 1100 = 00 (EOB) Codes of length 05 bits: 11010 = 05 11011 = 21 11100 = 12 Codes of length 06 bits: 111010 = 31 111011 = 41 Codes of length 07 bits: 1111000 = 51 ... Codes of length 15 bits: 111111111000100 = B2 111111111000101 = 63 Codes of length 16 bits: 1111111110001100 = 73 1111111110001101 = C2 ... 1111111111111100 = DA 1111111111111101 = EA 1111111111111110 = FA
Implementations in real JPEG decoders optimize this mechanism heavily as the bitstring search / parsing process is not a trivial task in processors designed to work with 32-bit words or bytes. Most of them end up creating large lookup tables that define lower and upper bounds for a match of a particular bitstring / code.
More Realistic JPEG Images
Obviously the above is an extremely simple example JPEG image. However, real images will have some other characteristics that you will encounter:
Chroma subsampling - You can expect that most photos will have 2x1 chroma subsampling, which will mean that the decoding sequence per MCU will be Y1 Y2 Cb Cr instead of Y Cb Cr.
AC components - You most certainly will have non-zero AC coefficients, unlike the above. In such a case, you will generally have a few non-zero values, which will eventually be terminated with a ZRL (code word 0xF0) which indicates a run of 16 zeros and then probably a EOB (code word 0x00).
Some more detail regarding Huffman coding with chroma subsampling and other factors are described in the JPEG decoder page.
JPEGsnoop Detailed Decode Output
Running JPEGsnoop on the image shown above, with the Scan Segment->Detailed Decode option enabled, the following output is shown:
*** Decoding SCAN Data *** OFFSET: 0x00000282 Scan Decode Mode: Full IDCT (AC + DC) Lum (Tbl #0), MCU=[0,0] [0x00000282.0]: ZRL=[ 0] Val=[ -512] Coef=[00= DC] Data=[0x FC FF 00 E2 = 0b (11111100 11111111 1------- --------)] [0x00000285.1]: ZRL=[ 0] Val=[ 0] Coef=[01..01] Data=[0x E2 AF EF F3 = 0b (-1100--- -------- -------- --------)] EOB DCT Matrix=[-1024 0 0 0 0 0 0 0] [ 0 0 0 0 0 0 0 0] [ 0 0 0 0 0 0 0 0] [ 0 0 0 0 0 0 0 0] [ 0 0 0 0 0 0 0 0] [ 0 0 0 0 0 0 0 0] [ 0 0 0 0 0 0 0 0] [ 0 0 0 0 0 0 0 0] Chr(0) (Tbl #1), MCU=[0,0] [0x00000285.5]: ZRL=[ 0] Val=[ 0] Coef=[00= DC] Data=[0x E2 AF EF F3 = 0b (-----01- -------- -------- --------)] EOB [0x00000285.7]: ZRL=[ 0] Val=[ 0] Coef=[01..01] Data=[0x E2 AF EF F3 = 0b (-------0 1------- -------- --------)] EOB DCT Matrix=[ 0 0 0 0 0 0 0 0] [ 0 0 0 0 0 0 0 0] [ 0 0 0 0 0 0 0 0] [ 0 0 0 0 0 0 0 0] [ 0 0 0 0 0 0 0 0] [ 0 0 0 0 0 0 0 0] [ 0 0 0 0 0 0 0 0] [ 0 0 0 0 0 0 0 0] Chr(0) (Tbl #1), MCU=[0,0] [0x00000286.1]: ZRL=[ 0] Val=[ 0] Coef=[00= DC] Data=[0x AF EF F3 15 = 0b (-01----- -------- -------- --------)] EOB [0x00000286.3]: ZRL=[ 0] Val=[ 0] Coef=[01..01] Data=[0x AF EF F3 15 = 0b (---01--- -------- -------- --------)] EOB DCT Matrix=[ 0 0 0 0 0 0 0 0] [ 0 0 0 0 0 0 0 0] [ 0 0 0 0 0 0 0 0] [ 0 0 0 0 0 0 0 0] [ 0 0 0 0 0 0 0 0] [ 0 0 0 0 0 0 0 0] [ 0 0 0 0 0 0 0 0] [ 0 0 0 0 0 0 0 0] Lum (Tbl #0), MCU=[1,0] [0x00000286.5]: ZRL=[ 0] Val=[ 1020] Coef=[00= DC] Data=[0x AF EF F3 15 = 0b (-----111 11101111 111100-- --------)] [0x00000288.6]: ZRL=[ 0] Val=[ 0] Coef=[01..01] Data=[0x F3 15 7F FF = 0b (------11 00------ -------- --------)] EOB DCT Matrix=[ 2040 0 0 0 0 0 0 0] [ 0 0 0 0 0 0 0 0] [ 0 0 0 0 0 0 0 0] [ 0 0 0 0 0 0 0 0] [ 0 0 0 0 0 0 0 0] [ 0 0 0 0 0 0 0 0] [ 0 0 0 0 0 0 0 0] [ 0 0 0 0 0 0 0 0] Chr(0) (Tbl #1), MCU=[1,0] [0x00000289.2]: ZRL=[ 0] Val=[ 0] Coef=[00= DC] Data=[0x 15 7F FF D9 = 0b (--01---- -------- -------- --------)] EOB [0x00000289.4]: ZRL=[ 0] Val=[ 0] Coef=[01..01] Data=[0x 15 7F FF D9 = 0b (----01-- -------- -------- --------)] EOB DCT Matrix=[ 0 0 0 0 0 0 0 0] [ 0 0 0 0 0 0 0 0] [ 0 0 0 0 0 0 0 0] [ 0 0 0 0 0 0 0 0] [ 0 0 0 0 0 0 0 0] [ 0 0 0 0 0 0 0 0] [ 0 0 0 0 0 0 0 0] [ 0 0 0 0 0 0 0 0] Chr(0) (Tbl #1), MCU=[1,0] [0x00000289.6]: ZRL=[ 0] Val=[ 0] Coef=[00= DC] Data=[0x 15 7F FF D9 = 0b (------01 -------- -------- --------)] EOB [0x0000028A.0]: ZRL=[ 0] Val=[ 0] Coef=[01..01] Data=[0x 7F FF D9 00 = 0b (01------ -------- -------- --------)] EOB DCT Matrix=[ 0 0 0 0 0 0 0 0] [ 0 0 0 0 0 0 0 0] [ 0 0 0 0 0 0 0 0] [ 0 0 0 0 0 0 0 0] [ 0 0 0 0 0 0 0 0] [ 0 0 0 0 0 0 0 0] [ 0 0 0 0 0 0 0 0] [ 0 0 0 0 0 0 0 0]
0 notes